
Bottle Sealing Wax
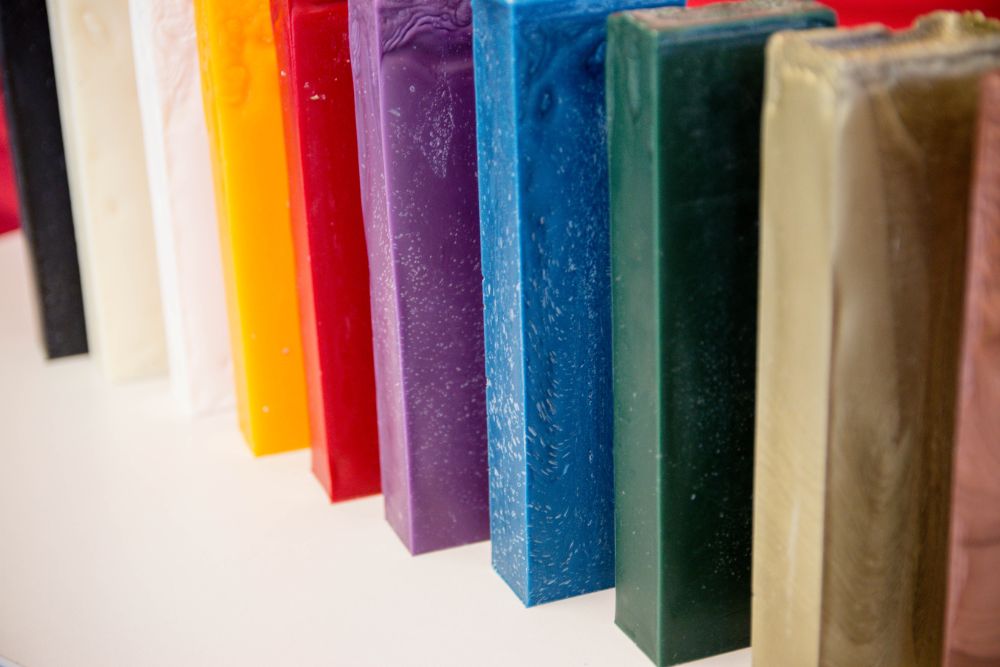
Our bottle sealing wax (also known as bottle wax or bottling wax) provides a strong, flexible wax seal for all types of bottles. It is food-safe (FDA-compliant) wax, and forms a moisture-resistant, tamper-evident coating over corks or caps to protect your product from air and spoilage. At the same time, it gives your bottles a distinctive, high-end look with a custom wax finish. Wax sealed bottles are commonly associated with liquors and alcoholic beverages like whiskey and wine. However, they are valuable for many other products, like honey, barbeque sauce, oils and perfume. Whether you’re a craft distillery, boutique winery, or artisanal hot sauce maker, our sealing wax provides a secure seal and premium look for your product.
Orders are processed within 3 – 4 business days.
|
| Clear |
|
|
| Clear |
Price Breaks Available
| 21 – 50 lbs | 51 – 100 lbs | 101 and over |
How to Seal Bottles with Wax: 5 Tips
Bottle sealing wax creates a secure seal to protect bottled goods, including beer, wine, honey, mead and maple syrup. Getting the seal right can make your product stand out from the competition and give it a unique aesthetic edge. While it may take a little practice and precision, bottle dipping is easy once you know how to do it. Keep reading to learn a few tips for using bottle sealing wax.
1. Choose Your Wax
To get started, select your wax. Our bottle sealing wax creates a strong, flexible, easy-to-remove seal that won’t crack or crumble. It’s available in many colors and finishes to match your branding needs. Choose from vibrant solid colors, sparkly metallics and shiny pearls. We can even create custom colors to match your brand. You can view color options and order those products directly through our website.
Remember that each pound of wax seals about 25-30 bottles when ordering your wax. Bigger projects will require more wax, and Blended Waxes offers custom colors for orders of 100 pounds or more, allowing you to match your brand design perfectly.
2. Get the Right Supplies
Make the dipping process easy with the correct supplies in a well-vented area with heat-safe equipment. You’ll need your bottled product, Blended Waxes Bottle Sealing Wax, one hot plate, two metal canisters (one for melted wax and one for water), room temperature water and a thermometer.
The size of your canisters will depend on how many bottles you plan to dip. If you’re only dipping five bottles, a canister the size of a soup can will do the job. If you’re closer to 50 bottles, choose a canister the size of a large coffee tin. Remember that whatever you use to hold your wax will be challenging to clean afterward. Use canisters you’ve dedicated for bottle dipping or a container you don’t mind losing.
3. Heat to the Right Temperature
Put the wax in one of your metal canisters and melt the sealing wax to about 250-275℉ for best results. Check your thermometer frequently during the dipping process to ensure the wax remains at the proper temperature. Do not heat past 300℉.
Heating to the right temperature ensures you get a smooth and sleek finish on each of your bottles. The wax will melt evenly, giving your product a flawless finish. Wax that’s too hot can become thin, giving a see-through look when it solidifies on your bottle. Colder wax will be difficult to adhere to the bottle, and you may notice a skin or film on the finished product. Keeping a close eye on your thermometer will ensure you get the smooth look you’re aiming for.
When adding the wax blocks into your canister, take your time. Add them slowly and stir regularly so that the wax melts sooner than it would if you had put them all in at once. Slowly adding the wax will also create a smooth and even texture, which is ideal for bottling wax.
4. Dip the Bottle
Dry the bottle off before dipping to remove moisture for the best seal. Hold the bottle upside down and dip the neck into the wax, fully coating it for a tamper-evident seal. Once the bottle is coated, remove it from the wax and let the excess drip off. Then, dip the top of the wax-coated bottle in the canister of room temperature water to set the wax.
Depending on how far you dip the bottle into the wax, one pound of wax can be used for 25 to 30 bottles. You’ll also need more than just a single pound of wax to create a basin deep enough to dip your bottle as deep as you prefer. The specific amount of wax you need will also depend on the shape of your canister.
5. Store Your Final Product
The wax typically cools in about 30 minutes. Before packing the bottles away, make sure the wax is completely cooled. The wax seal will protect your product from leaking or spilling. It also keeps air and bacteria out of the bottle during storage.
Buy Bottle Dipping Wax From Blended Waxes
Ready to give your product a professional wax seal? Order your bottle sealing wax now or contact our Wisconsin-based team for bulk inquiries and custom blends. You can rest assured that Blended Waxes’ bottle sealing wax will help your product stay fresh and ready for distribution. Purchase from us today, or contact us for more information on how we can help.
Check out this video for a step-by-step demonstration of how to use bottle sealing wax:
Premium Look & Brand Benefits
One major benefit of sealing wax is the unmistakable premium look it gives your bottles. A wax coating adds a distinctive and high-end look to a product, which draws in customers and makes your brand recognizable. Sealing bottles with wax is a traditional packaging method, and brands that choose this look often seem elevated compared to companies using other closure types. Choose from a range of wax colors and finishes to create a truly branded look.
Blended Waxes also offers custom colors to create a fully branded product. We can create a custom color for your wax and a matching label with Pantone or other color standards to align with your brand colors. Our custom colors are available for batch sizes of 100 pounds or more.
Specifications of our bottle sealing wax are:
- Melting point (D-938): The typical melting point is 130°F.
- Color (ASTM): The typical color is L1.0 (Off-White).
- Needle penetration (D-1321): The needle penetration of bottle sealing wax at 0.1mm at 77°F (25°C) is 3-8 and 8-20 at 100°F (38°C).
Custom Wax Colors
Available for bulk orders over 100 pounds (pricing may vary based on color)
Wax Types for Different Applications
At Blended Waxes, we offer an array of bottle wax types to suit your applications:
Bottle Wax: This product offers a strong and flexible coating that supports crisp bottle opening. The all-purpose bottle sealing wax will not crack or crumble when opened, and it will provide a reliable moisture barrier. Numerous colors and finishes are available. It’s a popular choice for craft beer, spirits, or gourmet sauces looking for a standard wax seal.
Gloss Bottle Wax: Create a glossy, high-shine finish for a truly distinctive look on any bottled product. Our gloss sealing waxes come in black or bright red to differentiate your product from the competition. This glossy wax still provides a secure seal, but its main advantage is the eye-catching shine that makes your product pop on the shelf.
Wine Bottle Wax: Using wine bottle wax adds a protective moisture barrier to the cork to prevent crumbling. It provides a tamper-evident seal and a classic look often seen on reserve wines and bourbons. When the product is opened, the wax layer can easily be removed when the bottle is chilled or at room temperature.
| Bottle Sealing Wax Properties | |||
| Test Description | Typical | Range | |
|---|---|---|---|
| Congealing Point (D-938) | 170℉ 77℃ |
161℉-179℉ 72℉-82℃ |
|
| Needle Penetration (D-1321) | |||
| 0.1 mm @ 77℉/25℃ 0.1 mm @ 100℉/38℃ |
3 7 |
2-4 4-10 |
|
FDA Status: This product is in compliance with Federal Regulations 21CFR-172.886. *FDA Status: These products are in compliance with Federal Regulations 21CFR-178.3710
Are custom colors available?
Yes! Custom colors are available by request, but there is a minimum order of 100 pounds of wax. Contact us to learn more. Common bottle sealing colors are bright red, black, burgundy, gold metallic, silver metallic, pink pearl, purple pearl, and blue pearl.
What can I use to melt the wax in?
A container with a temperature setting on it is recommended. Use a container with a thermostat (like a wax melter or thermostatic pot) to safely melt bottle sealing wax. A double boiler can work in a pinch, but it’s not recommended without temperature control.
How do I dip the bottle into the wax?
Typically, you will hold the bottle upside down and dip the neck of the bottle into the wax. Remove the bottle and let the excess wax drip off before turning the bottle right side up. (Pro Tip: briefly dip the sealed bottle in room-temperature water after wax dipping to set the wax.)
How much wax do I need?
You can usually dip 25-30 bottles per pound of wax. The size of your container will also play a factor into how much wax you will need. A larger container will need more wax to create enough depth to dip your bottles.
At Blended Waxes, we specialize in creating custom blended wax products for a wide range of applications. Our bottle wax formula ensures an even seal layer when the bottle is dipped.
We offer our bottle sealing wax in a range of quantities to suit your applications. Each pound of wax equates to anywhere from 25 to 30 bottles. We can ship bottle sealing wax in blocks or pastilles to suit your preferences. We have a broad selection of colors to choose from, and we can develop custom colors for larger orders.
The Blended Waxes team is happy to answer any questions you may have about bottle sealing wax. Get in touch with us today to learn more about this product.
How to Use Bottle Sealing Wax?
1. Use a heat safe container that has a temperature setting.
2. Dipping temperature is between 275°-300°f.
3. Hold the bottle upside down and dip the neck into the bottle sealing wax.
What Are the Benefits of Bottle Sealing?
1. Secure Seal
2. Unique Look
3. Easy To Apply And Remove
Does a wax seal make my bottle tamper-evident?
Yes! Once applied, our bottle sealing wax must be broken to open the product, so customers get a clear visual indication of any tampering.